
wanna clean and remove the radiato...HELP


Thread Starter
Joined: Oct 2007
Posts: 185
From:
I printed out this page from http://www.batee.com/corvette. I was wondering if anyone has done this. I was wanting to remove and clean my radiator. I read that the temps can be lowered by up to 20 degrees! Sounds good to me. I wanted to find a couple of pics of the process. The instructions from the site are good but pics never hurt. I want to ge intimate with my vette a little more...[sm=Awwww.gif] [sm=drlove.gif] [sm=loveeyes.gif] If you have done this or can help me find some pics I would really appreciate it. I will be sure to take tons of pics [sm=Flahssssss.gif] (as usual) and post the job. Thanks, ZR1clone

Joined: Dec 2007
Posts: 106
From:
Why fix something thats not broken? If the radiator is notcovered w/road debris and bugs and the inside is not coated w/ crap,or leaking,your going through the process for 'a maybe result'. The motor is still is going to want to run a 226F.All anyone needs to do is flush the coolant every couple years,change soft hoses,knock the road kill out of the condenser. I' m not trying to kill your love for your good looking baby,but if the car aint broke dont fix it
Joined: Dec 2007
Posts: 106
From:
Hey ZR1, At least your not like my brother,his '94LT1has the original antifreeze and transmission fluid from when he bought the car. Thats 145000 rough miles. Now the poor beast just sits w/ a bad heater core bald tires, and the trans leaks. Needs a viking bural. Keep up the think it can hurt. good luck.
Thread Starter
Joined: Oct 2007
Posts: 185
From:
Thanks, bro. Being a fellow yankee. I'm a transplant from MD. Now in AL. I was wondering...Does the 700r4 tranny downshift when you push the pedal to the floor? Or does the power just push the car? I have noticed that my vette doesn't seem to shift like it has a "passing gear". Maybe its just smooth. Any thoughts?
Joined: Dec 2007
Posts: 106
From:
Your car has a lock up torque converter. At cruising speedof 39-40mph it should engage. It usually a smooth shift,but does feel slightly different.To test the down shift keep the shifter in 3rd and at a cruise speed around 35, punch it and see if there is a down shift. After you do this and the car re-engages 3rd go over 45, push the shifter into overdrive and see if it engages.At a normal startgo to1st and go through each gear at smooth pace and see if all shifts you do manuallyhappen smooth and dont abuse it. If your over 45mph and overdrive is kicked in the car should glide along,till you accelerate, the overdrive kicks out and your back in 3rd. To make a long story short, I think your ok.

Member
Joined: Oct 2007
Posts: 33
From:
done this job and it's not too bad, here's a write-up I did and a couple of pictures.
I did it today. It really wasn't as bad as I thought it would be. The part that took me the longest was removing the OEM clamp from the hose at the throttle body to the "T" in the upper radiator hose. Oh, I replaced all the radiator hoses (4 in all on my 94) while I was at it. The radiator was full of crap, looked like cotton fiber coating the face of the radiator. I spent about an hour washing out the fins and using a little screw driver to straighten out the bent ones. Cleaned all the crap that accumulated between the radiator and condenser. Took the overflow tank and the other radiator filler tank out and cleaned the poo-poo out of them as well. While I had it up on the lift, I decided to clean the under side of the Vette and change the oil/filter and lube. I let it idle for about 30 minutes after I was all done, and the temp never went above 190. I can already see this was well worth the effort, where as before, it climbed up past 230 in the same situation. I am very pleased with the results.
I can also say that the most important tool I used for this chore were the ratcheting end wrenches that I bought last week. Many places the regular ratchet and socket were too deep to get into the space, but the end wrench NO-PROBLEM. What a time savers.
Radiator Removal
1. Disconnect Battery. I just took off the negative post.
2. Remove Air Filter Assembly. 2 outside bolts on filter housing (thumb screws) and loosen clamp on TB (straight screwdriver). There are three sensor connections on my 94, one way up front on the air filter housing, 1 on the MAF and one closer to the TB. Unplug all three.
3. Remove Horn on driver’s side. Just the one connecter there. (12mm socket)
4. Remove Air Pump. I just took off the three rubber mounted bolts from the bracket. Don’t do it that way, you have to go back and remove the bracket anyway to get to three little screws later, so just take bracket and all. This consists of two additional bolts (10mm) in bracket. The third bolt for the bracket is the one holding on the horn.
5. Remove Headlight relays (I think that’s what they are) mounted on the drivers side of the shroud (2, 10mm bolts). I just carefully laid it back out of the way so I didn’t have to unplug the connecters.
6. Move to passenger side. Remove Coolant recovery tank. One small hose (straight screwdriver), 2, 10mm bolts (w/large washers attached) to frame, and 1, 10mm bolt through the inner fender.
7. Remove passenger side horn. (12mm bolt), one connecter.
8. Disconnect small hose on radiator (from fill tank) straight screwdriver.
9. Remove AC dryer bracket blots from shroud (10mm bolts, 2) and I also removed the 10mm bolt that holds the dryer to the bracket, it gave me a bit more slack when I was removing the shroud later on.
10. I also removed the screw (10mm) that holds one of the AC coolant lines for the same reason. This screw was down on the crossmember frame right in front of the engine. Again this was to give me a little more slack when removing the shroud later.
11. Remove the 6 screws that mount the fan to the shroud (10mm). 3 at the top and 3 on the bottom. Lay the fans back a little way to clear the shroud.
12. Remove the bolts from the shroud. On the drivers side there are 3 little (7mm) screws that are down on the front under the frame rail. A 7mm nut driver works great on the bottom 2 the top one is a pain, I was able to loosen it enough with an open-end wrench and then screw it out with my fingers. (I have big hands, so it can be done, not easy but it can be done). There is also two 12mm or 13mm bolts that go through the shroud into the top of the frame rail, and one 10mm nut that must be removed from the top of the frame rail. On the passenger side there are the same three little 7mm screws, handle the same as the driver side. There are two 10mm nuts on the top of the frame rail and one 12mm or 13mm bolt.
13. At this point I drained the radiator. The pet **** on mine opened without any problem. I used an eight quart drain pan to catch the coolant (well sort of caught most of it).
14. Next I removed the radiator hoses, first the bottom hose (passenger side) more coolant will run out (missed most of it). Then the upper hose (drivers side), more coolant, more mess because I missed it too.
15. While I was doing this I had decided to change the hoses out. My 94 has the upper hose in two pieces connected with a brass “T” with a smaller hose running from the “T” to the TB. I replaced that hose as well. The lower hose was a 1 piece unit. I replaced them with genuine GM parts, bought them from Chris May @ Superior Chevy in Kansas City, 1-800-728 8267. The total for all four hoses and shipping was less than $70. You would have a hard time beating that price, just tell Chris you a Corvette forum member and you’ll get a discount. The biggest problem I had was taking off the OEM clamp from that small hose under the TB. It took me about 45 minutes, just couldn’t get to it from any angle. (when you put it back on, buy a screw type clamp and save yourself some headaches)
16. The next thing I did, (which if you have a standard transmission skip to the next step) was remove the automatic transmission cooling lines. A flare nut wrench is best here, but I didn’t have one so I carefully used a 12mm (I think) open end wrench. More mess as I didn’t catch the transmission fluid that ran out.
17. Next is the shroud removal. Carefully lift from the driver’s side first. Raise it up past the hood hinge (kind of a pain), and then you can work it up past the AC lines that go to the condenser.
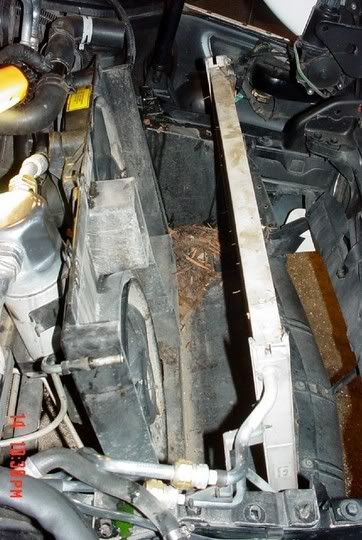
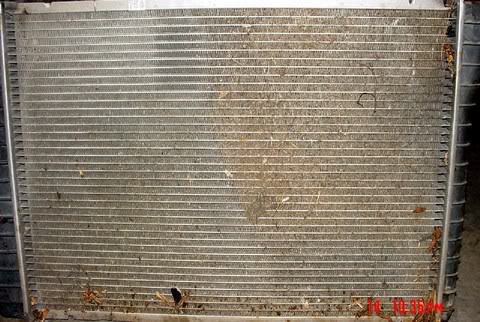
18. Once the shroud is off, the radiator can be removed. Note how much junk is in between the radiator and the condenser and how much junk is embedded into the front of the radiator. Clean the front of the radiator, if you use a high pressure hose (either water or air) be careful. High pressure stream can bend the fins over, reducing the cooling capacity of the radiator. Once I had the junk cleaned out I spent about 30 minutes straightening the fins that were bent over using a small flat blade screwdriver.
19. I took this opportunity to clean the front of the engine compartment in front of the fans really well. Vacuuming out all the junk and the front of the condenser as well.
20. Reverse the procedure for putting it all back together.
This one is a picture of the accumulated junk.
And one that shows all the embedded junk.
I did it today. It really wasn't as bad as I thought it would be. The part that took me the longest was removing the OEM clamp from the hose at the throttle body to the "T" in the upper radiator hose. Oh, I replaced all the radiator hoses (4 in all on my 94) while I was at it. The radiator was full of crap, looked like cotton fiber coating the face of the radiator. I spent about an hour washing out the fins and using a little screw driver to straighten out the bent ones. Cleaned all the crap that accumulated between the radiator and condenser. Took the overflow tank and the other radiator filler tank out and cleaned the poo-poo out of them as well. While I had it up on the lift, I decided to clean the under side of the Vette and change the oil/filter and lube. I let it idle for about 30 minutes after I was all done, and the temp never went above 190.
I can already see this was well worth the effort, where as before, it climbed up past 230 in the same situation. I am very pleased with the results. I can also say that the most important tool I used for this chore were the ratcheting end wrenches that I bought last week. Many places the regular ratchet and socket were too deep to get into the space, but the end wrench NO-PROBLEM. What a time savers.
Radiator Removal
1. Disconnect Battery. I just took off the negative post.
2. Remove Air Filter Assembly. 2 outside bolts on filter housing (thumb screws) and loosen clamp on TB (straight screwdriver). There are three sensor connections on my 94, one way up front on the air filter housing, 1 on the MAF and one closer to the TB. Unplug all three.
3. Remove Horn on driver’s side. Just the one connecter there. (12mm socket)
4. Remove Air Pump. I just took off the three rubber mounted bolts from the bracket. Don’t do it that way, you have to go back and remove the bracket anyway to get to three little screws later, so just take bracket and all. This consists of two additional bolts (10mm) in bracket. The third bolt for the bracket is the one holding on the horn.
5. Remove Headlight relays (I think that’s what they are) mounted on the drivers side of the shroud (2, 10mm bolts). I just carefully laid it back out of the way so I didn’t have to unplug the connecters.
6. Move to passenger side. Remove Coolant recovery tank. One small hose (straight screwdriver), 2, 10mm bolts (w/large washers attached) to frame, and 1, 10mm bolt through the inner fender.
7. Remove passenger side horn. (12mm bolt), one connecter.
8. Disconnect small hose on radiator (from fill tank) straight screwdriver.
9. Remove AC dryer bracket blots from shroud (10mm bolts, 2) and I also removed the 10mm bolt that holds the dryer to the bracket, it gave me a bit more slack when I was removing the shroud later on.
10. I also removed the screw (10mm) that holds one of the AC coolant lines for the same reason. This screw was down on the crossmember frame right in front of the engine. Again this was to give me a little more slack when removing the shroud later.
11. Remove the 6 screws that mount the fan to the shroud (10mm). 3 at the top and 3 on the bottom. Lay the fans back a little way to clear the shroud.
12. Remove the bolts from the shroud. On the drivers side there are 3 little (7mm) screws that are down on the front under the frame rail. A 7mm nut driver works great on the bottom 2 the top one is a pain, I was able to loosen it enough with an open-end wrench and then screw it out with my fingers. (I have big hands, so it can be done, not easy but it can be done). There is also two 12mm or 13mm bolts that go through the shroud into the top of the frame rail, and one 10mm nut that must be removed from the top of the frame rail. On the passenger side there are the same three little 7mm screws, handle the same as the driver side. There are two 10mm nuts on the top of the frame rail and one 12mm or 13mm bolt.
13. At this point I drained the radiator. The pet **** on mine opened without any problem. I used an eight quart drain pan to catch the coolant (well sort of caught most of it).
14. Next I removed the radiator hoses, first the bottom hose (passenger side) more coolant will run out (missed most of it). Then the upper hose (drivers side), more coolant, more mess because I missed it too.
15. While I was doing this I had decided to change the hoses out. My 94 has the upper hose in two pieces connected with a brass “T” with a smaller hose running from the “T” to the TB. I replaced that hose as well. The lower hose was a 1 piece unit. I replaced them with genuine GM parts, bought them from Chris May @ Superior Chevy in Kansas City, 1-800-728 8267. The total for all four hoses and shipping was less than $70. You would have a hard time beating that price, just tell Chris you a Corvette forum member and you’ll get a discount. The biggest problem I had was taking off the OEM clamp from that small hose under the TB. It took me about 45 minutes, just couldn’t get to it from any angle. (when you put it back on, buy a screw type clamp and save yourself some headaches)
16. The next thing I did, (which if you have a standard transmission skip to the next step) was remove the automatic transmission cooling lines. A flare nut wrench is best here, but I didn’t have one so I carefully used a 12mm (I think) open end wrench. More mess as I didn’t catch the transmission fluid that ran out.
17. Next is the shroud removal. Carefully lift from the driver’s side first. Raise it up past the hood hinge (kind of a pain), and then you can work it up past the AC lines that go to the condenser.
18. Once the shroud is off, the radiator can be removed. Note how much junk is in between the radiator and the condenser and how much junk is embedded into the front of the radiator. Clean the front of the radiator, if you use a high pressure hose (either water or air) be careful. High pressure stream can bend the fins over, reducing the cooling capacity of the radiator. Once I had the junk cleaned out I spent about 30 minutes straightening the fins that were bent over using a small flat blade screwdriver.
19. I took this opportunity to clean the front of the engine compartment in front of the fans really well. Vacuuming out all the junk and the front of the condenser as well.
20. Reverse the procedure for putting it all back together.
This one is a picture of the accumulated junk.
And one that shows all the embedded junk.
Thread Starter
Joined: Oct 2007
Posts: 185
From:
Wow! Thanks, Tom. That was exactly what I was looking for! I think I am going to try to do this Saturday. I'm getting my windows tinted on next monday. I am really glad you saw this. Seeing how nasty your radiator was...I think others might be considering this too. Thanks for the write-up and the pics. - ZR1clone
