
HotRodAir conversion, phase 1


Thread Starter
|
Senior Member
Joined: Nov 2005
Posts: 398
From:
Some folks have asked for a progress report and some insight... Here you go:
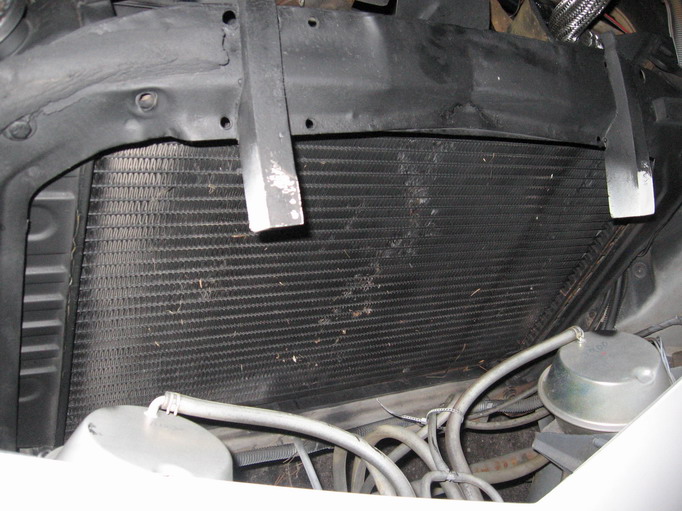
Step one, remove hood and old condenser:
Step two, remove the compressor:
Step three, remove the dash, all the duct work, and the inside heat/AC box:
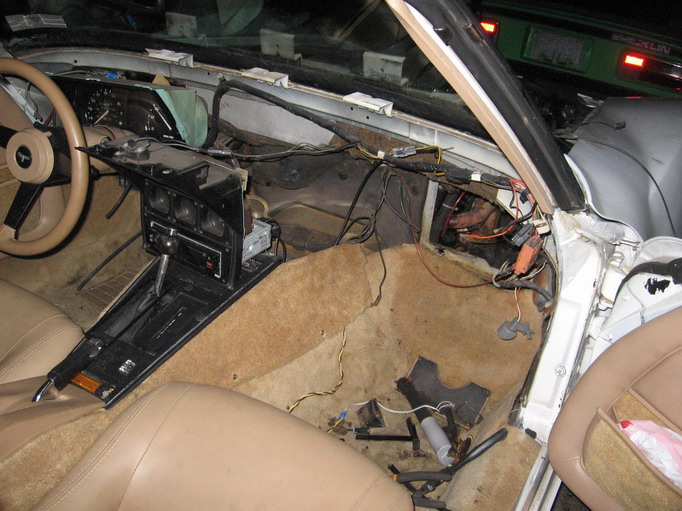
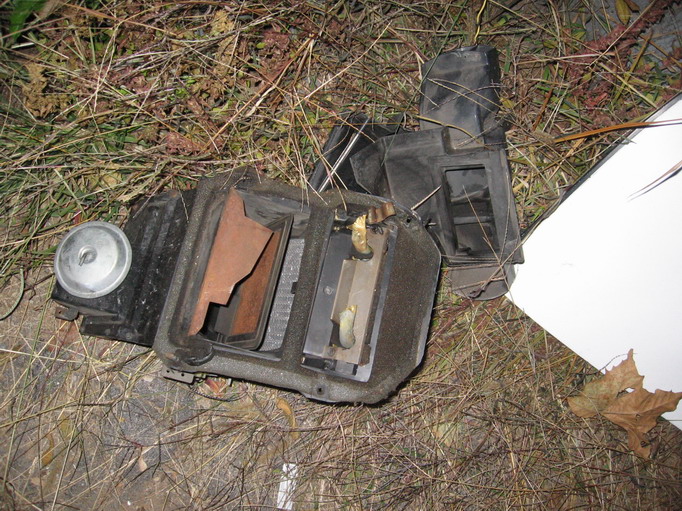
Step four, remove the outside heat/AC box, drier, hoses, bust knuckles, swear alot, find the hidden bolts and screws, swear some more, find the band-aids, crawl under the car, find more hidden bolts and screws, swear alot more, and throw the crap on to a big pile in the driveway:


Step five, order a new dash pad to replace the one that ripped when the 25 yr old foam gave up bending it around the A-pillars and gauges. Oh yeah, throw a new speedo/tach lens on that order, I cracked that one too.

Tomorrow I get to scrape off the old black gooey sealant (which is still way gooey and icky after 25 years), and start installing stuff.
bill.


Senior Member
Joined: May 2006
Posts: 159
From:
I am where you are right now. On the 69 there was a little more prep work to do. I had to drill (4) 1 1/4" holes in through the fender wells to run the A/C lines to the condenser and drier. I have the unit lying in the car now and should start to put it together this weekend. The advantage that I have is that I am doing this as part of the restification. The interior is completely gutted and there is no motor, trans, or radiator support in the car.
Thread Starter
|
Senior Member
Joined: Nov 2005
Posts: 398
From:
Wierdness... The instructions are for a car without factory air. I've found a couple places where the docs say "put the supplied bolt through the OEM hole", but there isn't one.
 Out comes the drill... The simple parts (mounting the condenser and drier) are becoming more of a pain than the wiring and vacuum stuff!
bill.

Super Moderator
Joined: Jul 2006
Posts: 5,244
From: Reno, Nv.
Sooo.......bill,
Hot Rod Air, is a complete system replacement, not just an implant unit, to augment the current system.
Right?
Hmmmmmmm? Intel...estink!
Great pics BTW!
They tell a lot!
(and a fine commentary!)
Hot Rod Air, is a complete system replacement, not just an implant unit, to augment the current system.
Right?
Hmmmmmmm? Intel...estink!
Great pics BTW!
They tell a lot!
(and a fine commentary!
)
Thread Starter
|
Senior Member
Joined: Nov 2005
Posts: 398
From:
Complete, end to end heat and R134A AC. The kit includes compressor, compressor bracket, AC lines, evaporator, condensor, drier, nuts, bolts, blocking plate for the old vent opening, blower, heater core, duct material, flexible hose to dash vent adapters, vacuum heat cut-off valve, and a blocking plate with rubber grommets for the firewall (where the old heater box was). Not exactly plug and play, but definitely workable with a couple holes, some light grinding, and alot of head scratching. The only thing not included that I could find was heater hoses from the engine to the inside unit, the antiseptic, and the box of band-aids.
Breaking the job down into pieces makes it pretty easy. I got the condensor and drier in today, and ran the AC lines to the right places. Tomorrow is compressor, blocking plates, and rigging a new vent setup. I like having the option of "outside air", and found all the right pieces (switch and vacuum selenoid valve) at a limo parts website. With any luck, I can get the inside unit wrapped up by the end of the week, and then I'll just have to wait for the new dash pad and speedo/tach lens to finish the job. I'm looking forward to having all that free space under the hood!!
bill.
Not exactly plug and play, but definitely workable with a couple holes, some light grinding, and alot of head scratching. The only thing not included that I could find was heater hoses from the engine to the inside unit, the antiseptic, and the box of band-aids.Breaking the job down into pieces makes it pretty easy. I got the condensor and drier in today, and ran the AC lines to the right places. Tomorrow is compressor, blocking plates, and rigging a new vent setup. I like having the option of "outside air", and found all the right pieces (switch and vacuum selenoid valve) at a limo parts website.
With any luck, I can get the inside unit wrapped up by the end of the week, and then I'll just have to wait for the new dash pad and speedo/tach lens to finish the job. I'm looking forward to having all that free space under the hood!!bill.
Senior Member
Joined: May 2006
Posts: 159
From:
Keep us posted. I am installing the under dash unit tonight. It is a kit for non-air cars. And I too noticed that there are several times in the instructions that it mentions OEM bolts. In one place it mentions removing the condensor bolts and replacing them with those from the kit. If it is a non-air car like mine, there is no OEM condensor. The only part that I am lacking is the piece that holds the center vents in the gauge panel. I found the insert that replaces the "CORVETTE" piece. I purchased new vents but I still need the piece that holds them in and attaches to the Hot Rod Air adapter. But I shall overcome all obstacles and finish the job in December or January when I put the crate motor in.
Senior Member
Joined: May 2006
Posts: 159
From:
Well, I put the unit in the car two nights ago. It went in fairly easy. I had to make sure that the bottom line was oriented with the compressor prior to tightening it and pushing it through the firewall. Once the unit is in you can't get to the lines. It would not be hard to remove the mount bolts and take it back out while the dash is still out. Now it will be several weeks before I get to the wiring. I am working on several parts of the car at the same time.
Thread Starter
|
Senior Member
Joined: Nov 2005
Posts: 398
From:
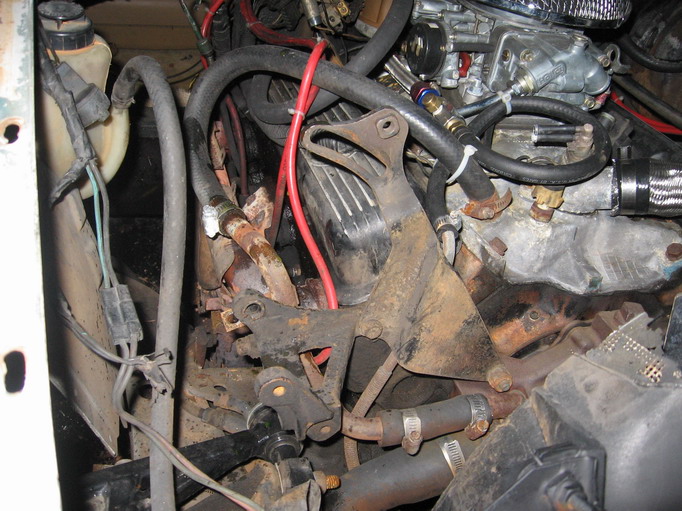
Had a problem with the compressor bracket that they sent with the kit. It wouldn't clear the manifold. I did some cutting and grinding, head scratching and bleeding, and finally noticed that if it were to fit, it would be in the same position as the factory bracket. The bolt pattern on the Senden compressor is the same as the factory. Duh. I put the factory bracket back on.
Next issue, the compressor is about 3+ inches longer than the stock one. The back of the compressor and one of the bolt hole tabs hits the valve covers. I moved it "outboard", using the inboard bolt tabs for the pivot bolt (the lower bolt that goes through the lower "cast" bracket. This put the adjusting bolt about 3" away from the slotted bracket.

I went with a 58" belt from my local NAPA, and fabricated a piece of 1/4" steel about 3.5" long, 1" wide, with a pair of holes to run between the upper-inside-rear bolt tab and the slotted bracket. At proper tension, the "adjusting side" of my fabricated piece is sitting dead center in the adjusting slot. Yay!!
If the belt loosens up a bit, I might need to go with a 57" belt, but at least I am close for now. there is about 1.5" of clearance between the belt and the A-arm, I'll need to keep an eye on that, but a shorter belt would pull that in and give me more clearance as well.Looooong day, one part installed. Nothing but inside work and hose connections now!!
bill.
Senior Member
Joined: May 2006
Posts: 159
From:
Bill, When you get a chance, please post a picture or two. I know when I get to it my issues will probably be a little different. I have headers that will be installed when I put the new engine in. My install is at a stand still for now. I bled the new brake system two night ago and found a leak at the brake block on the left rear. I had to buy another flare wrench, heat it and bend it so it would clear the frame properly and actually turn the fitting. Hopefully, it is tight now. I will check this evening and finish the brakes so I can put the wheels on the car. It has been on jack stands since May. I should have the project finished by February, I hope!